Android позволяет сохранить контакты на карту памяти в файл формата .vcf. И эта возможность легла в основу метода переноса контактов:
1. Android –> идем “Контакты” -> “Меню” –> “Дополнительно” -> “Импорт/Экспорт” –> “Экспортировать на SD карту”
2. Отправляем полученный файл .vcf по почте через приложение Эл.почта/Gmail на адрес, который настроен на iPhone
3. На iPhone открываем Mail.app, открываем письмо от андройда, выбираем приложенный файл .vcf
4. Добавляем контакты в адресную книгу. Можно добавить все, либо по одному. На выбор можно создавать новый контакт, либо добавлять номер к существующему.
Перенос контактов с телефонов работающих на Android на iPhone
Posted: 12 Листопада, 2013 in Все про телефониНалаштування 3G від Київстару (контракт) на планшетах (Android)
Posted: 31 Липня, 2013 in Все про планшетиНалаштування 3G від Київстару (контракт) на планшетах (Android).
1) Якщо користувачі не повинні вводити пінкод на карточку. Для цього необхідно зайти в
Настройки >Безопасность>Блокировка SIM-КАРТЫ
Зняти галочку біля пункту Запрашивать PIN-код для доступа к планшетному ПК
2) Далі заходимо в Настройки > Передача данных >Еще> Мобильная сеть.
Сторінка Настройки сотовой сети
Передача данных
Поставити галочку біля пункту Разрешить передачу данных по сети мобильной связи
Интернет-роуминг
Поставити галочку біля пункту Подключаться к службам передачи данных в роуминге (в іншому випадку ми не зможемо підключитись до мережі UTEL , а це є партнер київстару , до речі швидкість при підключенні до цієї мережі швидкість Інтернету більша).
Операторы связи Почнеться пошук мереж
Сторінка Доступные сети
Вибираємо UA–KYIVSTAR , UTEL (або 255-07, UA-07, UKR-07) Якщо зазначені відображення мережі «Утел» не знайдено, це означає, що покриття мережі «Утел» у даному місці відсутнє або кінцеве обладнання не підтримує стандарту 3G.
Якщо не появились мережі ми натискаємо на меню Поиск сетей Поиск всех доступных сетей. І вибираємо необхідну мережу.
3) Далі заходимо в Точки доступа (APN)
В планшеті Impression ImPad 9702 ми не можемо видалити точки доступу тому добавляємо нову APN Для цього вибираємо в меню Новая точка доступа вписуємо
Имя – 3GKyivstar
APN – 3g.kyivstar.net
Ставимо переключатель біля неї.
Якщо не працює дана точка доступу в даному регіоні то вибираємо точку доступу (при умові що дійсно перша не працює).
Имя – Kyivstar EDGE
APN – http://www.kyivstar.net
4) На Samsung Galaxy Tab 3 видаляємо всі точки доступу тільки створюємо одну або якщо існує вибираємо APN – 3g.kyivstar.net. , або коли не працює перша то APN – http://www.kyivstar.net
___
Збільшення виявлення шкідливих файлів антивірусом Trend Micro 10
Posted: 3 Липня, 2013 in Антивірусний захист1. Збільшення виявлення шкідливих файлів антивірусом Trend Micro 10 . Для цього необхідно в файл ofcscan.ini ( файл розміщується за шляхом папка інсталяції Trend Micro Office Scan 10 ru/PCCSRV/ofcscan.ini )добавити в глобальних параметрах
[Global Setting]
1stActForGenericVirus=<x>де X це 3 (очистка від вірусів).
2ndActForGenericVirus=<y>де X це 4 (очистка від вірусів).
Після цього було протестовано що файли створені вірусом наприклад file.exe в папках TEMP був видалений як в архіві, так при його переміщенні, при копіюванні. При чому якщо цієїї модифікації не зроблено то вірус буде пропущений (як пропущена потенційна безпека) і з цим файлом антивірус нічого не зробив.
Не ясно чи дана модифікація може зашкодити , якщо система спрацює неправдиво. Це звісно не можливо протестувати.
Ссилка на статтю
|
Unable to configure the scan action for the generic virus type
|
|
|||||||||||||||||||||||||||||||||||||||||||||||||||||||||||||||||||||||||||||||||||||
|
|||||||||||||||||||||||||||||||||||||||||||||||||||||||||||||||||||||||||||||||||||||
Ссилка на статтю
http://esupport.trendmicro.com/Pages/Configuring-OfficeScan-10-for-generic-detection.aspx
|
Configuring OfficeScan 10 for generic detection |
|
|
|
||||||||
|
|
||||||||
|
|
|||||||||||||||||||||
1stActForGenericVirus=3
2ndActForGenericVirus=4
3.Save and close the file.
4.Log on to the OfficeScan server web console.
5.Go to Networked Computers > Global Client Settings and then click Save to deploy the settings to the clients.
Important: OfficeScan client users, with the privilege to configure scan actions, must set the action to “Custom Action” to make sure that the new configuration that you deployed is applied to the client.
If the client user selected “ActiveAction”, it will override “Custom Action” since the former has a higher priority level.
After deploying the new settings, perform the following on the OfficeScan server:
1.Go to Networked Computers > Client Management > Settings > Real-time Scan Settings.
2.Select the following check boxes:
∙ Enable virus/malware scan
∙ Enable spyware/grayware scan
3.Go to Action tab and then select Use a specific action for each virus/malware type.
4.Specify your preferred scan action for each threat.
Note: For “Others” threat, set the first action as “Clean”, and second as “Quarantine” or “Delete”. This way, generic and other type of threats will have this set of scan action and will not “pass” if found uncleanable.
5.Click Apply to All Clients.
6.Perform steps 2-5 for Manual Scan and Scheduled Scan settings.
7.Run a manual scan from the OfficeScan server.
Проблема виликої папки Patterns Trend Micro OfficeScan Corporate Edition 10.0 Ru c пакетом обновлення SP1
Posted: 28 Травня, 2013 in Антивірусний захист- Стикнувся з проблемою Trend Micro OfficeScan Corporate Edition 10.0 Ru c пакетом обновлення SP1.
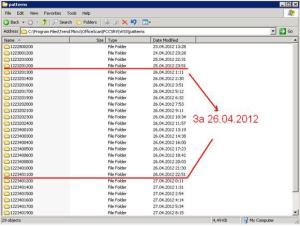
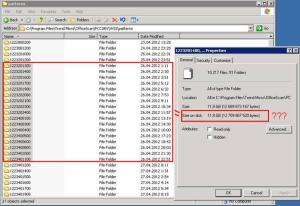
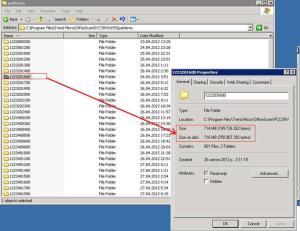
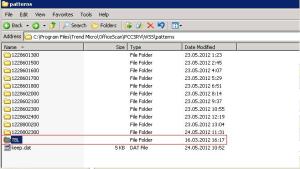
Дуже великий розмір папки Patterns (C: \ Program Files \ Trend Micro \ OfficeScan \ PCCSRV) близько 30 Гб, я так зрозумів що там находяться файли сигнатур для сканування файлів на основі сигнатур (pattern) та для сканування URL-адрес службою Web Reputation. Одна папка з сигнатурами займає близько 800 мб , таких папок, в день близько 17-24, розмір таких папок за день складає близько 12 Gb. Можу собі поміркувати , що за день OfficeScan викачує близько 12 Гб інтернет трафіку. Невідомо чому він не робить , що б тільки нові сигнатури додавалися? Як зменшити розмір папки?
C: \ Program Files \ Trend Micro \ OfficeScan \ PCCSRV \ WSS \ patterns
В інтернеті таких же проблем дуже багато як по версії 10 і 10.6 (достатньо ввести в пошук C: \ Program Files \ Trend Micro \ OfficeScan \ PCCSRV \ WSS \ patterns) але відповіді на дане питання точного немає. У документації пише , що потрібно всього 3,5 Гб . Звертання в службу підтримки нічого конкретного не дали крім переписки.
Папка росте якщо працює Smart Scan Server , переважна більшість він є інтегрований. Він необхідний :
1) На кінцевих точках клієнт працює в режимі Smart Scan
2) Включена функція Web Reputation. (дуже необхідна опція)
3) Включенні функції відслідковування зміни системних файлів , сканування на основі сигнатур.
Бачимо за один день розмір цих папок складає приблизно 12 ГБ . Оновлення сервера Smart Scan Server було встановлено кожної години.
На скріншопах видно що одна папка займає 800 мб таких папок 17 -24 шт. в залежності від наявності оновлення , в день розмір всіх папок приблизно складає 17 Гб.
Якщо , не використовуєте (це тілки припинення , розміру але аж ніяк не вихід з ситуації) , проблема криється глибше в обновленні Smart Servera.
1) На кінцевих точках клієнт працює в режимі Smart Scan
2) Включена функція Web Reputation. (дуже необхідна опція)
3) Включенні функції відслідковування зміни системних файлів , сканування на основі сигнатур.
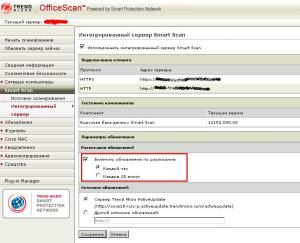
Знімаємо галочки включить обновления по расписанию.
4) Презапускаємо службу OfficeScan Master service
Рішення проблеми тимчасово на сайті виробника. Щодо обмеження розміру сигнатур.
http://esupport.trendmicro.com/solution/en-us/1057900.aspx
Problem Description
OfficeScan users often encounter issues about the old Smart Scan pattern files not being purged and therefore clogging the disk partition with old and excess copies.
This article tells you how to address this issue.
Solution
Trend Micro recommends limiting the pattern files kept by Smart Scan. Please do the following:
1. Launch Windows Explorer on the server where OfficeScan is installed.
2. Go to the C:\Program Files\Trend Micro\OfficeScan\PCCSRV\WSS folder.
3. Back up the UpdatePattern.ini file.
4. Open the UpdatePattern.ini file using Notepad or any text editor.
5. Go to the [GenBFDiff] section and update the following entries:
MaxDiff = 12
KeepPtn = 4
6. Save and close the file.
7. Restart the OfficeScan Master service.
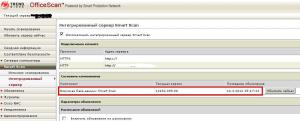
Проблема також криється в тому що файли завантажуються але Smart Scan Server їх не приймає.
Це видно по папці TBL .
А також в консолі
C:\Program Files\Trend Micro\OfficeScan\PCCSRV\WSS\patterns\TBL
Вирішення проблеми.
http://esupport.trendmicro.com/solution/en-us/1054971.aspx
Виконуємо дану процедуру , вона очищує папку з сигнатурами.
Do the following:
- Download the TBLPtnImportTool.
- Extract the tool to the C:\ drive of the WFBS server.
- Copy the latest Smart Scan pattern from ..\PCCSRV\wss\patterns\TBL to the ..TBLPattern folder. A sample folder path for this is C:\TBLPtnImportTool\TBLPattern.
- Open a DOS command prompt window and go to C:\TBLPtnImportTool\WSS.
- Run the following command: WSS_ImportTBL.bat
Related Information: How to reduce the number of patterns stored by WFBS
Скачуємо утиліту TBLPtnImportTool.
Розархівовуємо утиліту на сервері де встановлений Trend Micro OfficeScan на диск С:\
- Сопіюємо файл Smart Scan pattern з C:\Program Files\Trend Micro\OfficeScan\ PCCSRV\WSS\patterns\TBL (або де ви встановили **\ WSS\patterns\TBL)
В папку куди ми розархівували утиліти
- Запускаємо командну стрічку і переходимо в папку утиліт C:\TBLPtnImportTool\WSS та запускаємо утиліту WSS_ImportTBL.bat
- Все проводимо оновлення сервера.
_
